

As you'll already know from my first impressions or my review of the Star Fox remake for Switch 2, I'm something of an old sky dog in the Lylat System, with several accolades on my lapel. Star Fox 64 was already a game that demanded you play it over and over again, but I played it even more during my teenage years, almost thirty years ago. And I played its split-screen multiplayer too. Then I got hooked again on the 3DS and discovered the mysteries of the medals and high scores.
And as the saying goes, 'a leopard can't change its spots' and a fox itches to fly, so here we are again, playing loads of games on the new Star Fox for Switch 2, starting over again and again and enjoying its modernised graphics, music and voice acting like never before.
The original game is there in its entirety, but you should know that it comes with two very exciting new features for those of us who played the originals back in the day. Firstly, Challenge Mode, with loads of additional missions to complete (up to 6 objectives per planet). Then there's a brand-new Battle Mode (multiplayer), with its own new strategies and tips.
But before that, there are the good 'ol treats: the various routes, the medals on each planet, Expert Mode, the secrets to achieving the highest scores, and other tips and tricks. We've got questions and answers for all this and more in this essential Star Fox Switch 2 guide, and please feel free to leave your queries below if we haven't answered your questions. Let's rock and roll!
Essential Star Fox Switch 2 Guide: Frequently Asked Questions and Answers
How do you unlock Titania?
Hello, and welcome. We know you've come to this guide because you were searching for exactly this online. Whether it's because you're an old hand yourself but have forgotten, or because you've just bought the game and haven't figured it out yet. Don't worry, it's perfectly normal. And the truth is that Titania is the planet with the most unusual unlock method. So much so that you wouldn't even think to try it naturally.
Right, but how do I get to Titania? Your only way into Titania is via Sector X, so stop trying to take a shortcut from Solar or Macbeth. At the end of Sector X, if you haven't taken the teleport to Sector Z via the wormhole to cross the space-time rift, you'll come across the level's boss - another of Andross' weapons. It's called Spyborg and, just like ROB 64, it's a real tribute to the much-loved R.O.B., the NES toy that's been getting a lot of tributes and cameos of late.
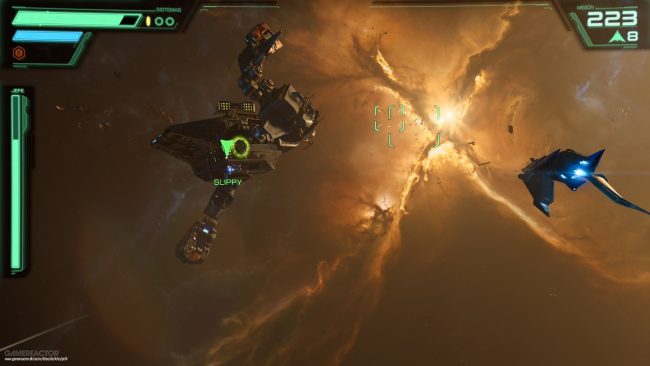
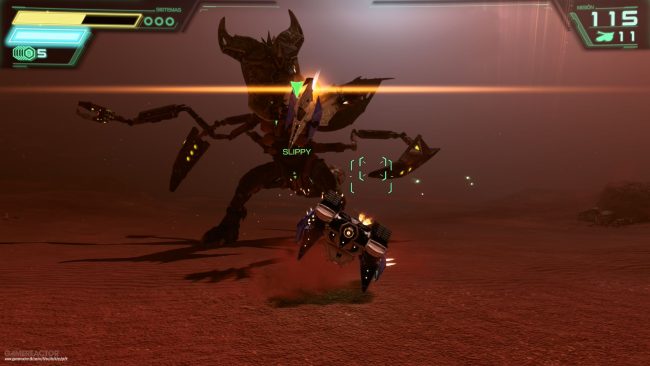
Right, start the battle by following Slippy and Peppy's instructions, but when Slippy recklessly flies in to investigate the robot up close, instead of continuing to damage the boss, let him attack Slippy freely. This way, your amphibious comrade will lose his bearings and, with his Arwing damaged, will go into a tailspin until... he crashes onto the surface of Titania.
Ignore General Pepper's advice: it's your dear friend we're talking about. You know which planet you're going to choose. You have to rescue Slippy, no matter how dangerous it is, and to honour him, the best thing to do is to cross the sandstorms of the desert planet using his finest invention: the Landmaster tank. Hurry and rescue your engineer friend from the clutches of the boss, the predator Goras.
How do you unlock Expert Mode?
By default, Star Fox features the traditional Normal difficulty mode as well as a more beginner-friendly option: Easy Mode. But Expert Mode was also a traditional feature, and it's unlocked in exactly the same way as it used to be: once you've earned a medal in Normal Mode on each and every one of the 16 planets. To find out what you need to do, check how many points are required for a medal on each planet further down below.
Medal Tip: Retrying doesn't cost you lives
If you're chasing a medal or a sky-high score, you can replay the level as many times as you like - it won't cost you any lives, and you'll start with the lasers and bombs you had at the beginning. This applies whether you restart the level from the pause menu or after completing the planet via the planetarium because you've decided to find a different route or aim for a higher score.
And here's a top tip: you can also do this from a checkpoint. This makes it much easier to rack up high scores: set yourself a target number of kills up to the checkpoint and, once you're happy with the result after several attempts, do the same from there right to the end of the level. Peppy won't tell you this one...
How many points do you need for a medal on each planet?
Well, remember that to get a medal, you not only have to reach the target score, but also keep all your squad mates alive. Alright, except for Slippy's peculiar case with the Spyborg in Sector X.
To find out how many casualties grant you a medal on each level, you just need to pause the game. It might seem a bit silly, but you'll find yourself using it all the time, especially on your first few playthroughs.
Also, at any point during the campaign, from the planetarium, you can press X to 'view achievements' and check your record and the routes you've unlocked (incidentally, unlike on the N64 and 3DS, here the scores you achieve in Campaign or Challenge Mode are shared) and whether you've earned a medal in Normal and Expert modes. In any case, here are the figures for each planet:
- Corneria: 150 hits
- Meteo: 200 hits
- Sector Y: 135 hits
- Aquas: 150 hits
- Katina: 130 hits
- Fichina: 50 hits
- Zoness: 250 hits
- Solar: 100 hits
- Sector X: 150 hits
- Sector Z: 100 hits
- Macbeth: 150 hits
- Titania: 150 hits
- Area 6: 300 hits
- Bolse: 150 hits
- Venom: 200 hits
- Venom 2: 200 hits
<h2>What's the best planetary route for scoring the maximum number of points?</h3>
That's one of the million-dollar questions. If you want to deal such a heavy blow to General Pepper that he lets out a curse instead of saying "What?!", these are the two routes that have historically been the most efficient in terms of the number of hits. Mind you, warm up and stretch because you'll arrive at Venom with stiff fingers, and remember that, as we told you in Corneria, on every planet there are tricks and secrets to bring out many, many more enemies and points than the medal indicates.
The classic route:
- Corneria
- Meteo
- Katina
- Sector X
- Macbeth
- Area 6
- Venom 2
The water route:
- Corneria
- Sector Y
- Aquas
- Zoness
- Macbeth
- Area 6
- Venom 2
Most of you should start with the classic route to try and score over 2,000 points, but once you start finding the secret points in Aquas and score more points than in Katina, it more than makes up for the potential loss in Sector Y vs Meteo, to the point where you'll be approaching 3,000 points. We'll expand on this section with more details and tips.
How can I get a medal in Venom 2?
It seems as though Venom 1 gives you far more points, with Andross' entire army waiting to give you a warm welcome, doesn't it? Well, no. If you do it right, Venom 2 scores even higher, but it's naturally harder to achieve.
By now you'll know that to earn a medal, you not only have to reach the target score for each level, but you must also keep your three teammates alive and kicking (or whatever each creature does). Well, that's the first challenge of this level, because the Star Wolf team, with their brand-new ships, won't make it easy for you and will tail each of your teammates to shoot them down. So, you must stop focusing on Wolf or whoever's attacking you, and immediately come to the aid of anyone who calls for help.
But it doesn't end there, as every Star Wolf member you shoot down gives you a hefty +50... if you're the one who shoots them down. You know where this is going, don't you? The biggest challenge is precisely that: it's up to you, Fox, to take out all four opponents, because if you lose focus for a couple of seconds and they're within striking distance, it'll be your mates who take down their respective nemeses. Without this, you won't get the required medal.
How do you unlock all the alternate routes?
One of the most fascinating things about Star Fox has always been the secrets in the form of alternate paths through the galaxy. There are loads of them, and back in the day we used to discover them almost without realising it, as we went along, but now Star Fox for Switch 2 records the unlocking of all the routes as an achievement in its own right, so here's what you need to do if you're missing a specific one.
- Corneria: Rescue Falco, pass through the 7 stone rings and destroy the Attack Carrier.
- Meteo: Fly through all 7 energy anomalies (wormhole shortcut to Katina).
- Sector Y: Complete the mission with at least 100 points.
- Katina: Destroy the Saucerer before time runs out.
- Fichina: Defeat Star Wolf before time runs out.
- Zoness: Destroy all 36 radar buoys without being detected.
- Sector X: 1. Defeat the Spyborg before it shoots down Slippy (see "How to unlock Titania" earlier in this guide). 2. Open and pass through the 4 energy gates (wormhole shortcut to Sector Z).
- Sector Z: Destroy all 6 Copperhead missiles before they damage the Great Fox.
- Macbeth: Flip all 8 track switches and the final rail switch.
How can I multiply my score on any planet?
There are two keys to scoring far more points than the number of enemies attacking you at first glance. Namely:
- Combos: Destroy groups of enemies with a single charged shot. Bombs don't count. This technique awards +1, +2, +3, etc., reflecting how many additional kills it counts. In other words, if you see a pair and take them down with normal shots, that's two points. If you do it with a combo shot, that's 2+1=3. The tricky bit here is firing at exactly the right moment (for example, when the butterflies cluster together)... or having enough time to do it whilst the camera pushes you along the on-rails sections.
- Making more enemies appear that were previously hidden. Sometimes you need to think of the enemy ships as insects. Flies, mosquitoes, or wasps - if you scare them away or disturb their nest, they'll come out into the open. To do this, keep an eye out for any structures that look suspicious and try to manoeuvre through them. Narrow gaps, vertical crevices, arches... Flying like this will cause more enemies to spawn, usually in groups that you can take out with a charged shot.
Tip: If you've locked onto the wrong target and want to switch to hit the whole group, hold down L+R to cancel the lock-on.
How can I score more than 220 points on Corneria?
Hang on, 220 kills? Is that even possible? On Normal difficulty? What are you on about? Well, yes: Never give up, trust your instincts, and all that. Whilst my record on the 3DS was 212 points, I've now beaten that, and in Corneria you can score 220 - and even a few more - if you practice enough. And I'll tell you how to achieve this feat step by step. Here's a prime example:
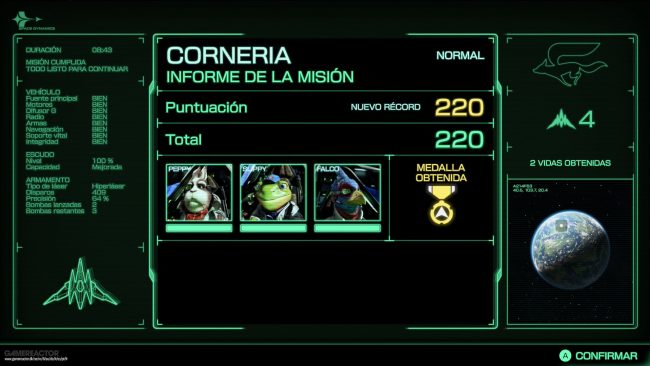
Now, make sure you've properly learnt the aforementioned two keys to maximising your score on any planet. With the theory firmly in place, let's move on to the practical side. To tackle any planet in pursuit of the maximum score, divide and conquer. Apart from the two halves separated by the Checkpoint, in Corneria we can identify several clearly distinct sections. In each one, you must reach a minimum score; if you haven't, you'll just have to start again and again without hesitation.
This is how I like to see Corneria:
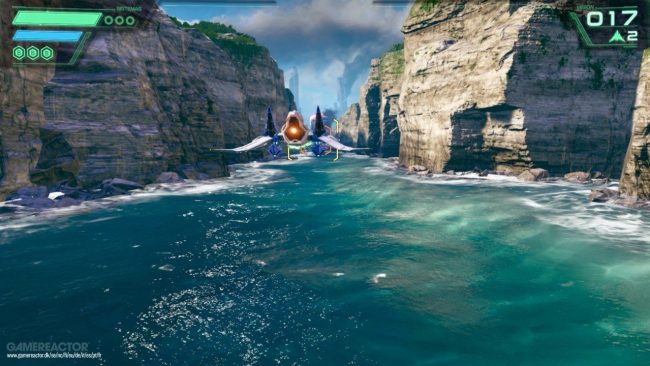
17 when you get here.
The Welcome Section: You must have 17 points by the time you finish the open sea section, before entering the rock walls. The only difficulty is taking down the first pair that's separated (head to the top-left corner of the screen to fire the charged shot) and then hitting a central ship in the group of five. Until you've scored 17 here, start again.
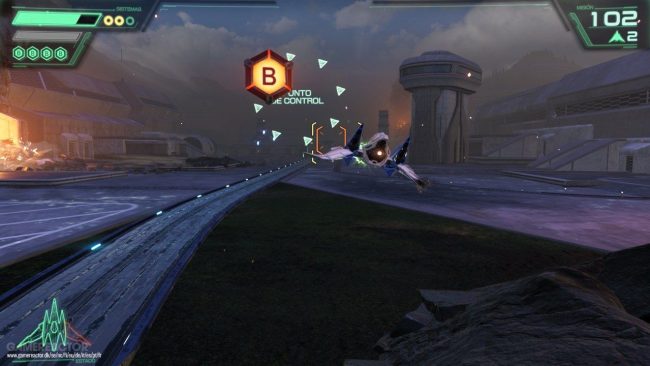
100+ at the Checkpoint.
The City in Flames: You must score around 100 points before the Checkpoint. This is the trickiest part of the level because you can spawn lots of extra enemies. From the previous point, line up the four butterflies that greet you in the city carefully. Next, you must pass through the two vertical fiery crevices (left first, then right) and take out each group with charged shots. Use the brakes! as much as possible to ensure you don't leave any groups unhit; don't leave any Garuda robots standing with normal shots, and try to align their flight patterns to take down pairs of groups along the way.
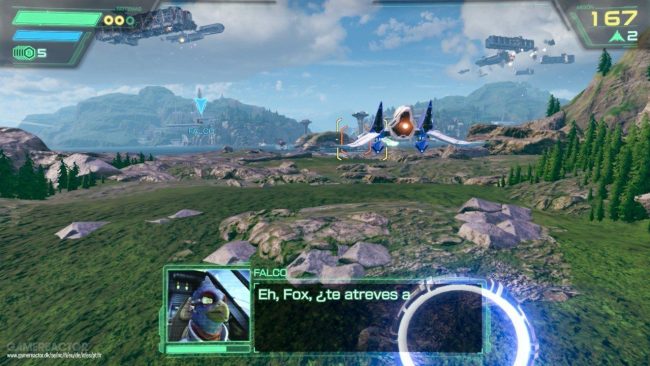
160+ when Falco challenges you.
The Corneria exit: 165 points before Falco's challenge. In the final section of Corneria, you must time your use of the brake and boost to the millimetre. As soon as you pass the checkpoint circle, fire your charged shot at the trio on the left without hitting Falco, then immediately deal with the rest. If you do it right, you'll be able to brake to take out the groups and, as soon as your cooldown is ready, accelerate to save Falco at the last moment. The good news is that retrying this from the checkpoint costs you nothing.
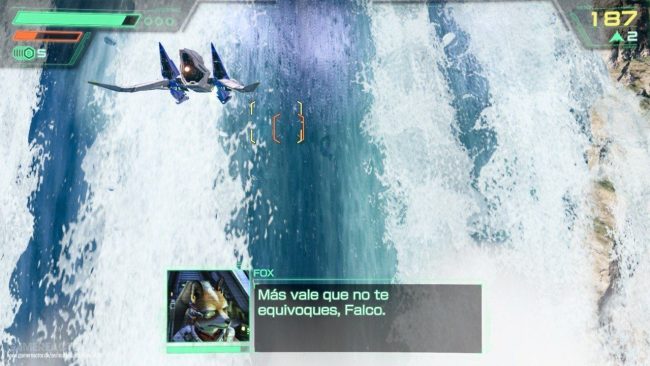
185+ going through the waterfall.
The Waterfall: 185 points when passing through the curtain of water. Right, if you've followed our instructions and are flying pretty smoothly, Fox, you should be able to take down all four Sky Bots during the stone arches challenge without any trouble. Slow down a bit before the first one and mix in bursts with charged shots. But! Before you take a dip, there's a trick. Aim to the left of the screen as you're pushed towards the waterfall and fire up to three charged shots to rack up kills along what would have been the standard route through the level to the Granga boss.
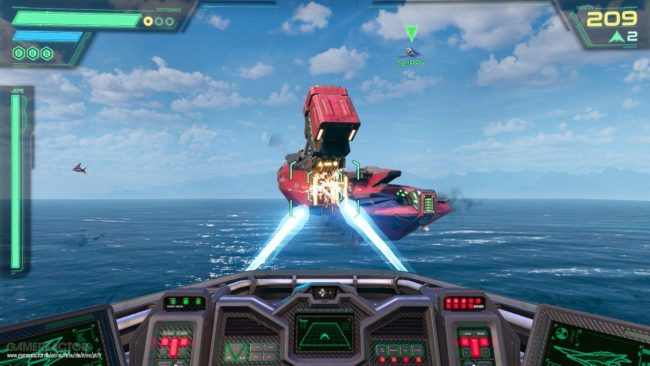
205+ arriving to the boss.
Bombardment: 205 before the Attack Carrier. If you've done everything right so far, you can reach the planet's alternative boss with over 200 points. We've currently scored 209 towards our record of 220 (1+10). As soon as you pass through the curtain of water, lock onto the flying enemies diving down and fire a homing bomb - this is more effective than a charged shot as they're so spread out. You'll then have time to launch a second bomb to clear the screen, but save a charged shot for the final group of the level: if you wait for them to form up, you can easily score a +4 or +5.
And you, how many points can you score on Corneria?
How can I complete the Holoviewer and customise my pilot battle banner?
The Holoviewer is a delightful encyclopaedic new feature that adds a wealth of Star Fox lore to what you already know, including background on characters and enemies, locations, historical events (here you can revisit the prologue and the fall of James McCloud) and much more.
But completing it is quite tricky because, whilst the first profiles are easily unlocked by playing through the Campaign, unlocking routes and earning medals, the more difficult ones start to become available by completing normal and expert challenges.
The same goes for the coolest backgrounds and emblems for your online Battle Mode Banner and even for the characters you can use in the Character Avatar settings. In other words, to complete Star Fox 100% on Switch 2, you'll need to earn all the medals and routes on Normal and Expert, as well as complete all the challenges on both difficulty levels. Furthermore, certain emblems are earned by completing online matches or achievements in Battle Mode.
Note: Some backgrounds and emblems for the Battle Banners are also exclusive to scanning Star Fox amiibo figures (Fox McCloud, Falco Lombardi, and Wolf O'Donnell).
Pro Alternative: The 'loaded but not locked' method or, officially, the Charged Unlocked Shots (CUS). We set our first count at 17 before entering through the stone walls, didn't we? Well, there's a secret technique for very advanced players that allows you to finish that first section with 36 knockdowns. If 220 seemed impossible to you, what do you think now, and how far could you go? That's right, over 300. To execute this technique, you need to know how to cancel target lock-on (a previous tip in this guide). This way, you can charge shots without them being automatically directed at specific enemies, which basically allows you to aim them completely manually. Much harder, yes, but if the points you earn depend on how many extra enemies you take down, you can now rack up points even with the stragglers. If you learn the layout and the timing, you'll be able to land charged shots at strategic points where groups gather, and your multiplier will skyrocket.
Tips for Multiplayer Battle Mode
In the early days of online play, the first and most important tip we can give you is to play with friends. Firstly, because it's much more fun, especially if you use GameShare and the furry avatars. But above all because a well-coordinated squad makes a huge difference in the online battlefield. Otherwise, all the players just end up in a messy "free-for-all", and what you want here is, for example, for one player to stay on the periphery taking out opponents whilst another flies low towards the target and a third provides cover. Tactics like this will make you unstoppable.
But there's more:
- Make the most of your altitude. It doesn't matter which map you're on: if you fly at the default altitude, you're an easy target. Fly low when you need to collect meteorites (obviously) in Fichina, but also when you're capturing the zone in Corneria or flying very low when you want to go unnoticed in Sector Y, and fly high when you need a bird's-eye view of your opponents to attack from above.
- Don't always rush straight back in. If you're anything like us, you'll already be pressing the boost button during the respawn countdown to get back into the action as quickly as possible, won't you? Whilst this can be good for grabbing lasers or power-ups, or for taking opponents by surprise, if there's no urgency to capture the area, it's best to wait a little while, arm yourself properly and observe the distribution of opponents and allies to make a more strategic move rather than just lasting a few moments.
- Try to guess the satellite zone in Corneria. There are only about three possible zones for the capture dome. If, right at the start - or when none is active - you try to get close to one of the possible zones, you might just capture it on your own in a matter of seconds.
- Use the teleports in Sector Y. Many players are still unaware of them, so a good tactic is, as soon as you spawn - and this time without picking up any items - to head straight for that sort of 'white hole' floating off to one side. That way, you'll spawn right behind the enemy's rear, and - provided you don't get too close to their defensive turrets - you can turn round and take a couple of them out from behind to knock them down.
- Support is essential. Although in Sector Y it's all about scoring 'goals', in Fichina it's about collecting meteorites and in Corneria it's about capturing the zone, many, many matches are decided by support points, which make all the difference. If you're not going all out for the objective, you can take out the CPU's support squadrons at 5 points per unit, not to mention the opposing team's shoot-downs at 30 points. Bear in mind that a single objective is worth 100 points, so it's not that big a difference, and with support points you can lead your team to victory.
- Destroy the meteorites in Sector Y and the antennas on Fichina. Another thing that not many people know yet: apart from the items you can pick up whilst floating around or by shooting down other ships, these two elements are destructible and are great for getting energy rings... and even a laser!
- Change the team colours. By default, Star Fox is blue and Star Wolf is a fairly similar shade of purple. Change this in the settings so that Star Wolf stands out clearly in maroon.
- Your basic laser is lethal, and make good use of the power-ups. Don't underestimate your standard laser or get too caught up in searching for an upgrade: leave that for the campaign. With the standard laser, you'll soon learn to take down enemies in a matter of seconds. On the other hand, don't hold onto the power-ups you collect for too long, as it'll often be too late by the time you want to use them. Launch that bomb you're carrying as soon as you lock onto an opponent; don't delay in loading the drones to boost your laser; and don't hold off on using the shield if you're about to come across a different power-up. You need to rotate through them to get the most out of them.
- If you use up your boost, you won't be able to get away. If you're always going at full speed as if you had a golden mushroom from Mario Kart, you won't have a chance to swerve or turn to escape an enemy right on your tail, or a charged shot or a guided bomb. Speed up, as Peppy says, but only if you're really in a hurry, and save your boost strategically for the hairpin bends.
- You've earned more than three titles. Although the victory screen highlights the two or three most important titles you've achieved, if you check the full results table you'll see that sometimes you're awarded five or even six titles - or at least that's what we've managed to achieve here.
[Under construction...] Last updated: 2 July 2026.
