Projekt Alfa: The video game dream car that became a reality

It was time... To sell it. After four years with my professionally built Nissan GT-R (R35) and as many fun moments behind the wheel as possible, it went away there a little over five years ago now. Some relief at not having to worry about fragile transmission components and perversely expensive street licks came as well as a much larger portion of missing.
After a couple of impulse-driven, ill-considered jumps between Hemi-based Yankees and a really fun Focus RS on rally wheels, I slowly but surely started to find the desire again for a sports car or at least a performance car with proper driving characteristics. But I wanted something with a working back seat and I didn't want to buy German. My childhood friend Bosse started talking about a certain Alfa Romeo early on, and even though I had already seen the reviews of the 2018-2019 Giulia Quadrifoglio during the first conversation about a potential car purchase, between two engine-crazy friends, that car was never even on the map, personally.

It was when the pictures of the special model GTA/GTAm appeared and it was clear that Alfa had built the most visually stunning sports sedan I had ever seen, that the thoughts started to run. When I then traveled to Codemasters to look at upcoming games and during a very pleasant dinner chatted with the editor-in-chief of the car site Drivetribe that the plans really started to take shape. Ben said that the Alfa Romeo Giulia Quadrifoglio was one of the best cars he had ever reviewed, in all categories, and that he would rather choose a GTA than any Porsche, McLaren or Lamborghini. I remember how surprised I was by his lyrical assessment, but when someone who has reviewed 300+ performance cars says one thing, I am hardly the one who refuses to listen. I did the opposite. I traveled home, unlocked the Alfa Romeo Giulia Quadrifoglio GTAm in Gran Turismo 7 and started dreaming. Of course, I would never get my hands on or afford the nearly three million special model... But maybe I could buy the base model and make the relatively few changes that Alfa itself made to the special version?
Once my thoughts start spinning, it's usually already done. When I've set my mind to doing something and really got my eyes on a project, it's often next to impossible to stop myself or distract myself. I spoke to my old childhood friend David, whose huge car-building garage has been more or less empty for the past year, and asked if he would like to be part of a possible Alfa build. His brother Fredrik has worked for over 20 years as a professional mechanic and jumped on the bandwagon, and after that it was just a matter of finding the right car, finding the stuff to be able to upgrade the car to a GTA.
I booked a black 2019 Quadrifoglio just outside Uppsala, basically finalizing the deal over the phone after they agreed to trade in my Ford Focus RS for exactly the same money I bought it for. No problem. The trip down in the Ford reminded me of how extremely stupid I often am in my car purchases, as a completely dumb rally sled is of course completely insane to drive around in for an almost 100-year-old, stele-operated uncle. The purchase, or exchange, with money in between of course went quickly after I test-drove the Alfa for a short while. With 39000 km on the odometer and brand new paint, a completed service book and one owner, there really wasn't much to complain about. I then drove the car from there to the Ferrari/Alfa workshop outside Uppsala, which spent a week's work installing a different soup system, injectors, airbox, downpipes and new software. 520 horsepower became 620 (which is 75 more than in the GTA model) and I also bought the GTA model's control system for the gearbox, which gives more distinctive and race-like hard, faster gear changes. After ten days down there, I took the train down to Uppsala to pick up the car and drive it home.
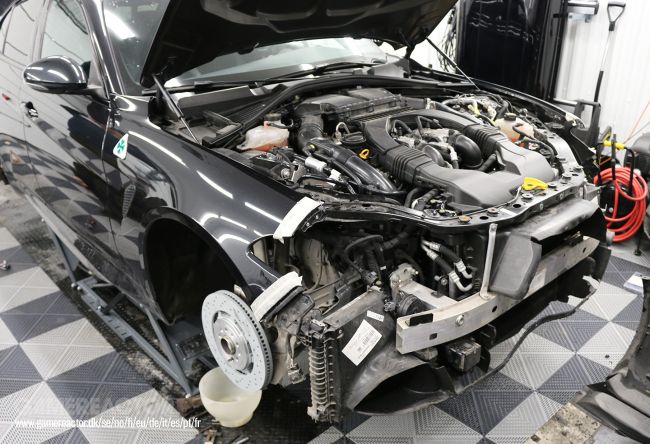
Once home, we started pretty much immediately tearing down the brake system, removing the original shock absorbers, removing the exhaust system, the front, the rear bumper and the doors. Even before buying the car, I had decided to paint it green (like Alfa's old racing cars and like the green clover on the front fenders that indicates that it is one of Alfa's performance models). I installed a lot of extra carbon fiber inside the cabin that I ordered from Madness Autoworks in Atlanta and the GTAm rims I found used (but new, without a scratch) via a Facebook ad, and had a friend drive them up. Before I even got the car home, I had also ordered the GTA front from The Paris Garage as well as the rear wing, the rear mirrors, the rear diffuser and the fender flares for the rear fenders via Koshi Group in Slovakia. Most of what arrived was in good condition, fit perfectly except for the front (which is made of fiberglass, which is pure hell to work with) which barely fit at all.
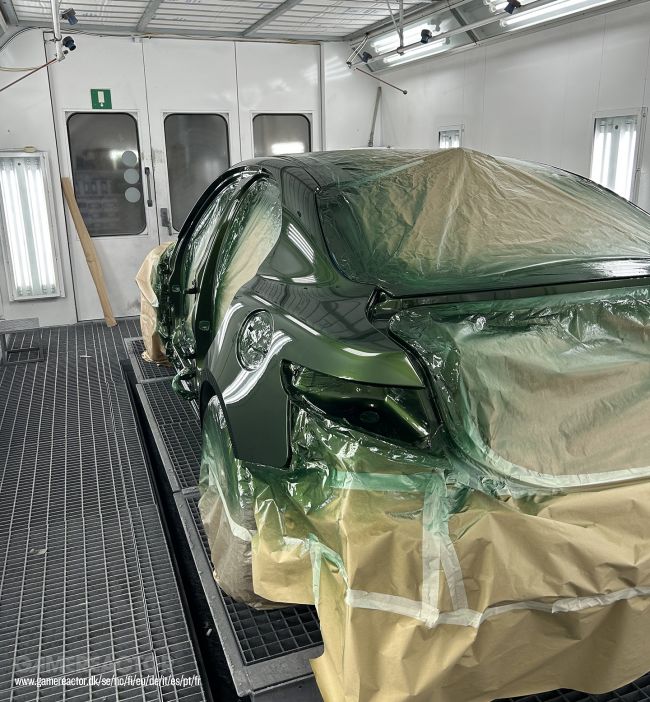
Professional help was required here as David, Fredrik and I quickly realised that we did not have the experience or knowledge to adapt clumsily designed panels and it was here that I came into contact with a man named Jocke, body boss at Audi in Östersund and a diligent car builder in his spare time, and with his experienced knowledge and knowledge of materials, attachments, fit - the work could continue. Adapting the front bumper, adding more fine filler, repairing cracks that had arisen in shipping via fibreglass filler and aluminium mesh on the back of it and expanding the downforce splitter at the front was really no easy task. Since I did not want to use the Sachs. system with the speed-activated active spoiler in the front from the original car, we also had to turn off those sensors after removing the pistons themselves for it and instead we built a six centimetre long front lip from a thin sheet metal one millimetre thick as well as polyester fabric and polyester filler.
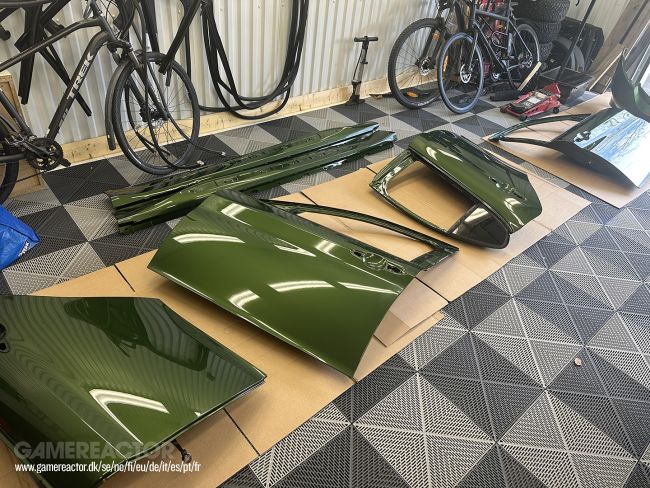
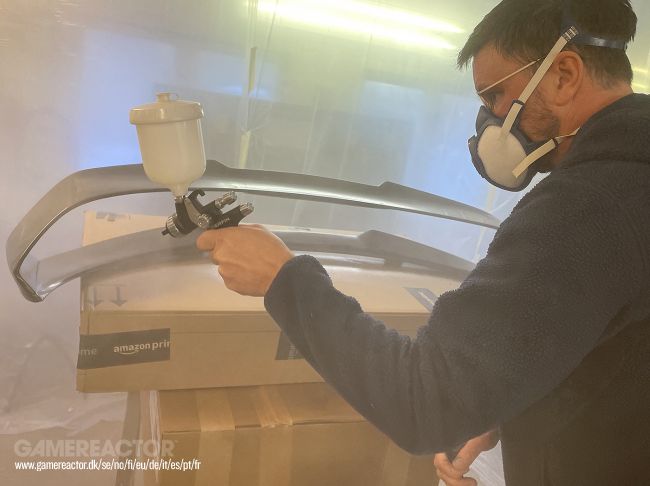
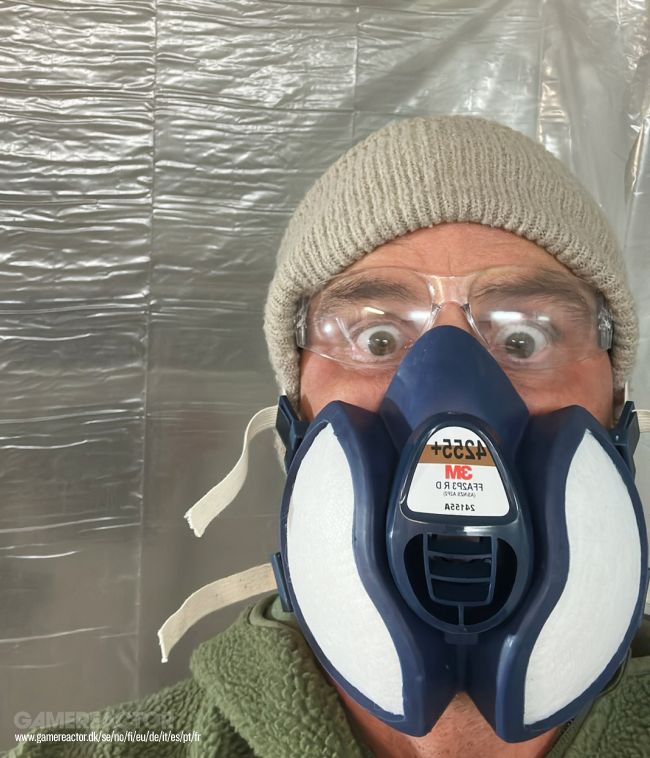
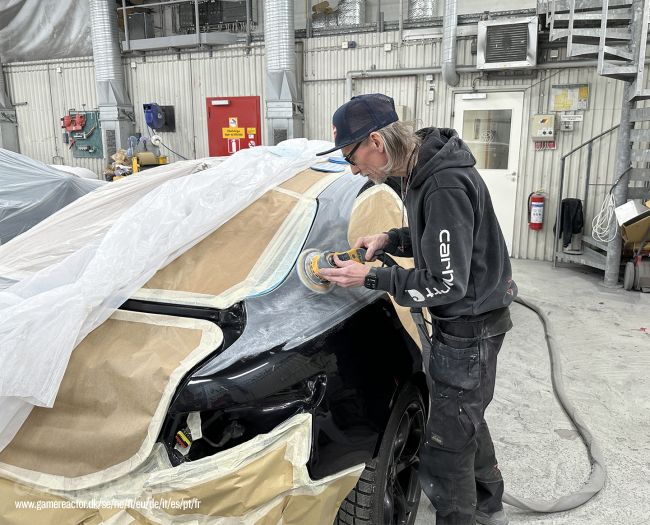
While Jocke was tinkering for about two whole weeks with the front and moving the mounts, putty, repairs and symmetry towards the front fenders, I took the opportunity to queue up a real clear coat sprayer, paint and hardener - I wrapped my friendly neighbor's old garage in plastic and started to clear coat the rear wing, the front gills for the front, the grill, the rear fender widening and the wing mirrors which were all delivered in the form of bare carbon fiber (the manufacturer wanted $2200 to clear coat and wet sand/polish the things, which I refused to pay). I learned the difference and the relationship between pressure and quantity, started painting in the evenings and then wet sanded down the orange peel effect into the surface of the clear coat 24 hours later and then started over, again. I took the opportunity to apply plenty of clear coat to all the carbon fiber details, partly to have lots of material to wet sand in order to get that mirror-like, crystal-clear surface that factory-painted cars and car parts almost never have - but also to have enough protection over the carbon fiber fabric to be able to repair damage from stone chips and other things.
The taillights from the original car were then removed from the rear, new GTAm headlights were ordered from Germany (they have black inserts instead of red) and I unscrewed the headlights to sand down the surface plastic and then polish. There were a few small scratches and about ten stone chips on the headlights in particular, which I of course removed by sanding with 800-grit paper, then 1500, then 2000, 3000 and then machine polishing with a lambswool roller.
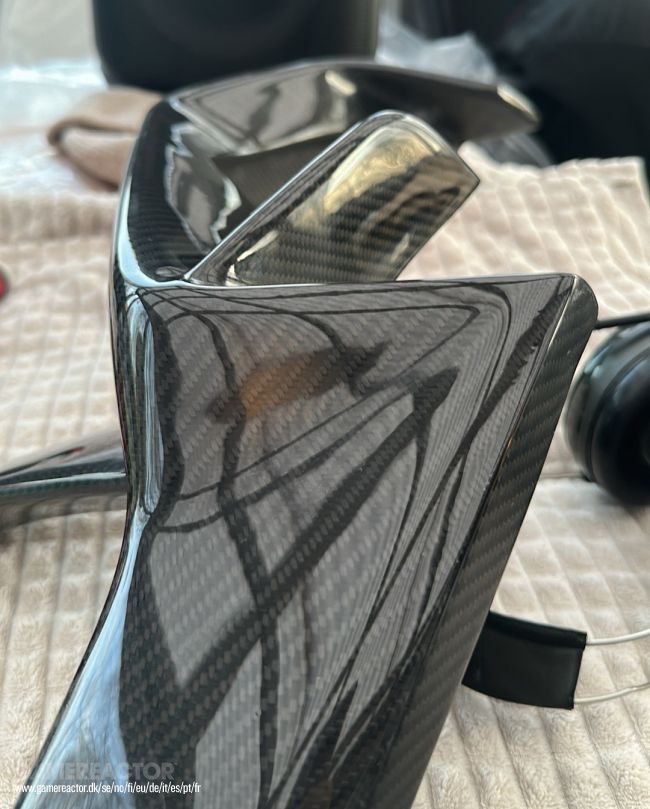
When all the painting in the neighbor's garage of all the carbon fiber parts was completed, a whole month of tireless wet sanding in four steps began, which was then replaced by diligent polishing before I reached that mirror-like, smooth surface that I was after. The idea was to try to make every single little carbon fiber detail that was so caterpillar-like Koenigsegg-shiny, and then of course all forms of natural orange peel effect that occurs when paint dries must be sanded down and polished up.
<bild>You (Swedish( readers helped me choose the color.</bild>
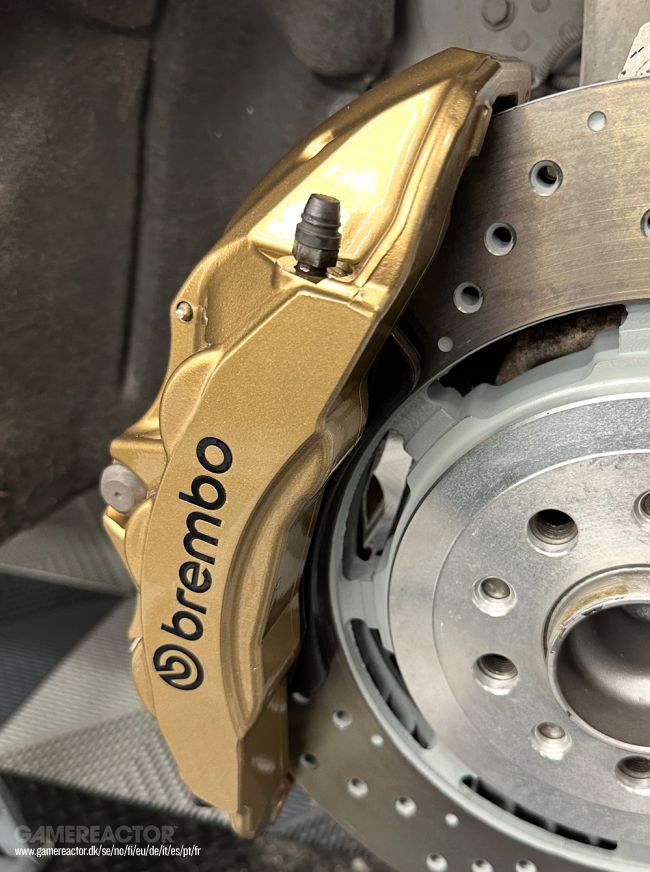
<bild>Just like the color of the brake calipers, which I had originally intended to paint in red metallic before Gamereactor veteran Marcel suggested "cold gold".</bild>
At the same time that I completed the carbon fiber panels, the car was handed over to Björn and Andreas Granlöf at Autolack in Östersund, who began the work of repainting the body. I had a lot of trouble trying to decide which shade of green I wanted, but there, just like with the choice of brake caliper color, you helped me reach a decision. The color was a slightly customized version of the Lamborghini color Verde Ermes, which has more gold pigment in it than it has green, which means that the pearl effect helps with relatively radical color shifts depending on the amount of light.
<bild>Björn Granlöf at Autolack Östersund started the sanding job on the body itself.</bild>
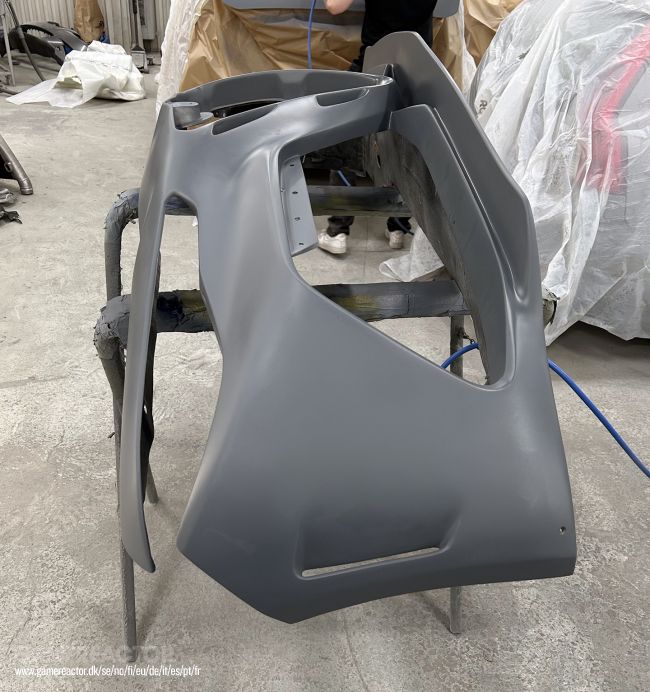
<bild>The front was ready for paint after many long days of body work and sanding.</bild>
<bild>Ready to get painted.</bild>
First, the original black paint was matted down before the car was washed, dried and prepared for paint. I chose a color that requires a black or dark gray base, which of course was smart so that Autolack would not have to prime the entire car first (my black paint was in pristine condition and no filler was required over dents, tears or excessive sanding on any of the panels).
<bild>Björn has been painting for 30 years, rarely paints entire cars these days, but is of course a super professional down to the last detail.</bild>
<bild>After the paint has been applied, it is sanded down, cleaned and blown clean with compressed air.</bild>
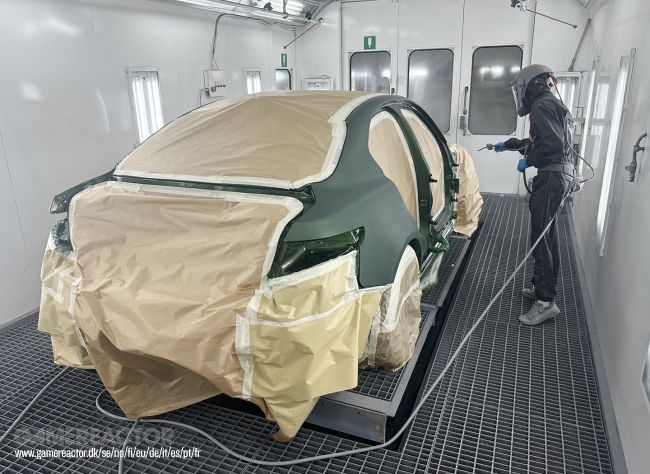
Björn could then start painting the fancy green color and I documented the several hours in the paint booth, which will appear in an upcoming short video summary that has dragged on just like this babbling summary article.
<bild>The first two coats of clearcoat have been applied here and already here the car looks incredibly shiny.</bild>
<bild>Two additional layers including intermediate sanding are applied to the bodywork here.</bild>
After paint comes clear coat and even during this process I found myself inside the paint booth with Björn to see a true master at work. Björn Granlöf applied more than double the amount of clear coat compared to what he usually does on enthusiast cars (which is already twice as much as on a factory painted car) and he applied it so perfectly that the panels looked wet sanded and polished after curing, which is of course impressive and a clear sign of a lot of routine and incredible feeling.
<bild></bild>
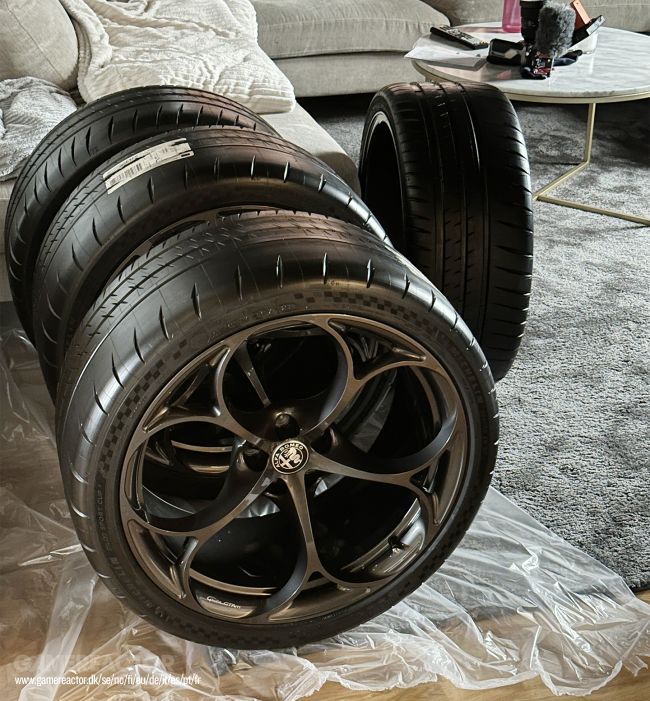
<bild>Polished, ceramic-sealed 20" magnesium wheels with matching Michelin Cup Sport 2 soles.</bild>
While the paint was curing at home at Autolack, I took the opportunity to spend the entire Easter weekend really protecting the parts I had at home while the bodywork dried. I machine polished all four GTA rims in five steps (!) and then applied Arcticlean's ceramic sealer (Base Coat / Top Coat) and then topped it off with their Hybrid wax. I then did exactly the same thing on the rear wing, fender flares, front gills, rearview mirrors, roof wing, exhaust pipe sleeves and grill.
<bild>The fully painted, fully cured body on its way home.</bild>
<bild>Time for re-assembly.</bild>
<bild></bild>
With the car painted and the curing complete, the body was towed home to the garage and the doors, front fenders, front and rear bumpers were pushed in a sea of blankets into a furniture van by my good friend Victor. Once home with the car and all the freshly painted parts, we started marking up and drawing up a plan for what would be installed when, in what order and by whom. Since I am the absolute worst of the four of us (Fredrik, David, Jocke and I) at all types of mechanics and assembly, I was given responsibility for the more... Non-fragile parts.
<bild>There has been a lot of wet sanding over the past six months.</bild>
<bild>Fredrik Olofssen and Jocke Pålebrink work on fine details in the assembly of gills, grilles, emblems and grills.</bild>
When the rear wing was both screwed and glued (Sika Flex contact adhesive), I saw to my horror that the carbon fiber itself had eaten more clear coat than was reasonable, which meant that I was forced to wet sand it, again. It took about four hours including polishing but was of course worth it. This while Fredrik and Jocke had arrived at the GTA front itself, mounting the carbon fiber gills, the grille behind, the carbon fiber grill, the black GTA emblem and the attachments that we built ourselves to make it fit well.
<bild>Minus the windshield, this is starting to look like a finished car.</bild>
Akrapovich exhaust system mounted, spacer plates mounted on the rear axle, Tarox brake kit installed and bled, doors, moldings, windows, side skirts, fenders, handles, rear bumper, rear diffuser, front, hood, side mirrors... Everything started to fall into place here and the amount of joyous roars were not in short supply in the garage this late evening at the end of May, no.
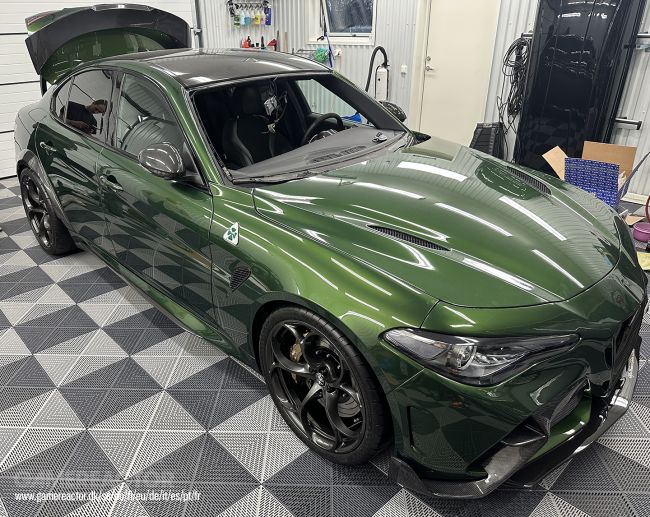
<bild>Finally done after seven months. Photo by Niklas Sundin.</bild>
<bild>The end result is truly dazzling and the Alfa with its 620 horsepower is a blast to drive. So much character in the dynamics of the chassi and the engine is wonderful.</bild>
Half the car replaced or rebuilt, the engine tuned, the gearbox sharpened along with the chassis, brakes, exhaust system, body and the end result was really just as good as I had hoped for, or better. When I sat that evening after discussing the next car purchase with the Drivetribe editor and painted my GTAm in Gran Turismo 7 in all sorts of different colors, zoomed in on details and dreamed away - I had hoped we would get here, but perhaps did not expect it to go as well as it did throughout the project. Project: Alfa is finished, finished, completed and I would like to take this opportunity to thank you, the reader, for sticking with the blog project itself, helping with the color selection for the brake calipers and body. Of course, I would also like to thank David Grahn, Fredrik Olofsson, Jocke Pålebrink, Victor Sandberg, Andreas Granlöf and Björn Granlöf for your great help.